


How to make real-time multiplayer WebXR experiences (part 2)
Using Websockets, React Three Fiber and DynamoDB to submit and retrieve user positions.


Intro
In my last blog post, I spoke about the concepts of how to implement real-time multiplayer WebXR experiences.

This post will demonstrate the practical sides of that blog post, so that you can start to adapt the code samples into your application — or if you’d like — leverage the Wrapper.JS WebXR template I’ve created (where the code snippets are taken from).
If you haven’t already, then please read part 1 of this tutorial series — so that you can then understand the concepts for how code snippets below work.
Ready?? Set… Go!!! :D
Code Examples
In another one of my recent posts about how to make WebXR experiences that work across any device — I spoke about a Higher Order Component (HOC) I created called XRScene.
In these code examples, we will expand on:
- how to instantiate the Websockets
- how to emit data with the Websockets
- retrieving & visualising Websocket data
Lets begin :D
How to instantiate the Websockets
In order to emit and retrieve data with Websockets, you need to first set them up in your application.
Lets take a look at how I’ve set them up, by first seeing how my index.js file is set up.
The index.js file
You can see that this file declares the front end that is rendered for the index route ‘/’.
I’ve highlighted lines 7 and 19–42, which show the Higher Order Component (HOC) XRScene where the logic for the 3D application (three.js) is written.
Its inside of this component, where we need to see where the Websockets are implemented.
import Head from 'next/head'
import dynamic from 'next/dynamic';
import React, { useRef, useState, Suspense, lazy, useEffect } from 'react'

import Header from '../components/Header'

const XRScene = dynamic(() => import("../components/XRScene"), { ssr: false });
const Shiba = lazy(() => import("../components/3dAssets/Shiba.js"), {ssr: false});
const Slide = lazy(() => import("../components/3dAssets/Slide.js"), {ssr: false});
const Dome = lazy(() => import("../components/3dAssets/Dome.js"), {ssr: false});

export default function Home() {
  return (
    <>
      <Head>
        <title>Wrapper.js Web XR Example</title>
      </Head>
      <Header />
      <XRScene>
        <Shiba
          name={'shiba'}
          position={[1, -1.1, -3]}
          rotation={[0,1,0]}
        />
        <Dome
          name={'breakdown'}
          image={'space.jpg'}
          admin={true}
        />
        <Slide
          name={'smile'}
          image={'smile.jpeg'}
          position={[-2, 1, 0]}
          rotation={[0,-.5,0]}
          width={10}
          height={10}
        />
        <ambientLight intensity={10} />
        <spotLight position={[10, 10, 10]} angle={0.15} penumbra={1} />
        <pointLight position={[-10, -10, -10]} />
        <spotLight position={[10, 10, 10]} angle={15} penumbra={1} />
      </XRScene>
    </>
  )
}
XRScene Component
This component is responsible for dynamically selecting the appropriate WebGL renderer for the browser that is used to open the web page (as documented in this previous post I’ve made).
I won’t go over what I’ve already discussed in that post, but note that on lines 18 and 34, there is a Sockets HOC that contains the WebGL rendering logic as its children components.
Its this Sockets component that we need to look at.
import React, { useRef, useState, useEffect, Suspense, lazy } from 'react'
import RenderWeb from './RenderWeb';
import RenderAR from './RenderAR';
import RenderVR from './RenderVR';
import deviceStore from '../../stores/device';
import Sockets from './../Sockets';

export default function XRScene(props) {
  const { children } = props;
  const { device, setDevice } = deviceStore();
  useEffect(() => {
    const fetchData = async() => setDevice(await checkDevice())
    fetchData();
    // eslint-disable-next-line react-hooks/exhaustive-deps
  }, [])

  return (
    <Sockets>
      {device != undefined && device == 'webAR' &&
        <RenderAR>
          {children}
        </RenderAR>
      }
      {device != undefined && device == 'webVR' &&
        <RenderVR>
          {children}
        </RenderVR>
      }
      {device != undefined && device == 'web' &&
        <RenderWeb>
          {children}
        </RenderWeb>
      }
    </Sockets>
  )
}

const checkDevice = async() => {
  if(navigator.xr == undefined) return 'web'
  let isAR = await navigator.xr.isSessionSupported( 'immersive-ar');
  if(isAR) return 'webAR';
  let isVR = await navigator.xr.isSessionSupported( 'immersive-vr');
  if(isVR) return 'webVR';
  return 'web'
}
Sockets Component
In this component you can see we are using a library called react-use-websocket to implement Websockets.
On line 11 you can see we are setting the Websocket that the application should use and are ensuring it is secured using the JWT received by Cognito to ensure the Back End is only visible to authenticated users.
Between lines 19–23 we are updating our application’s global state with the latest received message and a function to send a message.
import React, { useState, useEffect } from 'react';
import useSocketIO, {ReadyState} from 'react-use-websocket';
import { wsApiURL } from './../../utils'
import socketStore from './../../stores/socket';
import cognitoStore from './../../stores/cognito';


const Sockets = (props) => {
    const { children } = props;
    const { cognito } = cognitoStore();
    const [socketUrl] = useState(`${wsApiURL}?token=${cognito.jwt}`)
    const { setSendJsonMessage, setLastJsonMessage } = socketStore();
    const {
        sendJsonMessage,
        lastJsonMessage,
    } = useSocketIO(socketUrl);


    useEffect(() => {
        setSendJsonMessage(sendJsonMessage);
        setLastJsonMessage(lastJsonMessage);
        // eslint-disable-next-line react-hooks/exhaustive-deps
    }, [lastJsonMessage]);

    return (
        <>
            { children }
        </>
    );
}

export default Sockets;
How to emit data with the Websockets
Now we’ve gone over how the Websockets are set up, lets see how we can use them to emit user positional data in real-time.
Lets start by looking at any of the components rendered within the Sockets component, for an example lets use the RenderAR component.
RenderAR Component
This component is responsible for returning the ARCanvas component (which is a WebGL renderer for devices that can use Augmented Reality on the browser).
There are two components that I will be talking through in this tutorial, the Camera component and the Avatars component.
The Avatars component is used to render other users who are moving in the site, so the user can see them — I will explain this further down in the tutorial.
The Camera component is responsible for configuring movement and sight for the logged in user, this is where we will start for looking at how data is emitted with the Websockets.
import React, { useRef, useState, useEffect, Suspense, lazy } from 'react'
import { VRCanvas, ARCanvas, useXR, DefaultXRControllers, Hands } from '@react-three/xr'
import Camera from './Camera';
import Avatars from '../Avatars';
const RenderAR = (props) => {
    const { children } = props;
    return (
        <ARCanvas style={{
          height: '100vh',
          width: '100vw'
        }}>
          <Suspense fallback={null}>
            <Avatars/>
            <Camera
              fov={65}
              aspect={window.innerWidth / window.innerHeight}
              radius={1000}
            />
            <DefaultXRControllers />
            {children}
          </Suspense>
        </ARCanvas>
      )
  }

export default RenderAR;
Camera Component
The Camera component is responsible for configuring movement and sight settings for the user that is logged into the application.
I’ll detail how the Front End for this application works, as well as how it interacts with the Back End (the actual Websockets themselves).
There is a lot of code below in this example that sets up the details for the Camera for what the user can use for movement/sight is configured.
I’ll assume for the interest of simplicity that you understand the basics of how Three.JS works and will skip straight to the part where the actual sockets are implemented.
I’ve highlighted lines 51–53 and 61–81, which show:
- 51–53: A trigger being set to true ever 250 milliseconds
- 61–81: A useEffect lifecycle method that is triggered every time the trigger is activated. This function is responsible for emitting the positional data using a function called sendJsonMessage.
Within this useEffect function, the following is happening:
Line 62 gets the username of the logged in user
Lines 63–67 is defining the data that will be emitted to the Websocket
The type is set to ‘users’ as we are defining positional data for users
- A unique Identifier (uid) is set to the username we just defined on line 62
- The actual movement data is defined in the ‘user’ local state variable
3. Lines 68–73 essentially check if the trigger is set to true and then ensures that if there is movement data available to reset the state that allows movement data to be tracked and if not sends and empty data packet
4. Lines 74 -77 contain the actual function that emits the datat to the Websocket
5. Line 79 resets the trigger state variable
import * as THREE from "three";

import { useFrame, useThree, extend } from '@react-three/fiber';
import React, { useRef, useEffect, useState, useMemo } from 'react';
import { useXR, useXRFrame } from '@react-three/xr'
import cognitoStore from './../../stores/cognito';
import socketStore from './../../stores/socket';

const Camera = (props) => {
    const ref = useRef();
    const set = useThree((state) => state.set);
    const { player } = useXR()
    const [xPos, setXPos] = useState([]);
    const [yPos, setYPos] = useState([]);
    const [zPos, setZPos] = useState([]);

    const [xRotation, setXRotation] = useState([]);
    const [yRotation, setYRotation] = useState([]);
    const [zRotation, setZRotation] = useState([]);
    const [movement, setMovement] = useState(false);
    const [trigger, setTrigger] = useState(false);
    const [user, setUser] = useState([]);
    const camera = useThree((state) => state.camera)
    const { cognito } = cognitoStore();
    const { sendJsonMessage } = socketStore();
    const posCorrection = (props.posCorrection) ? props.posCorrection : 0;
    const positionVariables = {
        setXPos, setYPos, setZPos,
        setXRotation, setYRotation, setZRotation,
        camera
    }

    useEffect(() => {
        const updatedPositions = {xPos, yPos, zPos, xRotation, yRotation, zRotation};
        updateGlobalPositions(updatedPositions, setMovement, setUser);
        // eslint-disable-next-line react-hooks/exhaustive-deps
    }, [xPos, yPos, zPos, xRotation, yRotation, zRotation])

    useFrame(() => updatePositions(positionVariables));
    useXRFrame(() => updatePositions(positionVariables));


    useEffect(() => {
        set({
            camera: ref.current,
        })
        ref.current.position.set(0, .5, -5);
        ref.current.lookAt(new THREE.Vector3(0, .5, 0));
        ref.current.updateProjectionMatrix()

        setInterval(()=>{
          setTrigger(true);
        }, 250);

        if(player) {
          player.position.y -= posCorrection;
        }
        // eslint-disable-next-line react-hooks/exhaustive-deps
      }, []);

      useEffect(() => {
        const { username } = cognito;
        let newData ={
          type: 'users',
          uid: username,
          data: user
        };
        if(trigger){
          if(movement == true) {
            setMovement(false);
          } else {
            newData.data = '';
          }
          sendJsonMessage({
            action: 'positions',
            data: newData
          });
        }
        setTrigger(false);
        // eslint-disable-next-line react-hooks/exhaustive-deps
    }, [trigger]);


    return (
        <perspectiveCamera ref={ref} {...props}/>
    )
}


const updatePositions = (positionVariables) => {
    const {
        setXPos, setYPos, setZPos,
        setXRotation, setYRotation, setZRotation,
        camera
    } = positionVariables;

    setXPos(camera.position.x)
    setYPos(camera.position.y)
    setZPos(camera.position.z)
    setXRotation(camera.rotation.x)
    setYRotation(camera.rotation.y)
    setZRotation(camera.rotation.z)
}
const updateGlobalPositions = (updatedPositions, setMovement, setUser) => {
    setMovement(true);
    const { xPos, yPos, zPos, xRotation, yRotation, zRotation } = updatedPositions;
    let position = {
        x: xPos,
        y: yPos,
        z: zPos
    };

    let rotation = {
        x: xRotation,
        y: yRotation,
        z: zRotation
    }
    let newUserData = {
        position: position,
        rotation: rotation
    };

    setUser(newUserData);
}
export default Camera;
Submitting positional data in the Back End
Once the data is submitted on the Websocket, a Lamda function containing the below code is run on the Back End.
It takes the data that is sent from the Front End and saves it to a DynamoDB Table (see line 47).
The contents of the DynamoDB table is then returned to the Front End (see lines 21–25).
'use strict';
// const util = require('util')
const AWS = require('aws-sdk');
const dynamoDb = new AWS.DynamoDB.DocumentClient();

module.exports.handler = async (event, context) => {
  const {IS_OFFLINE, positions_table_id, domain_name, stage, api_local_ip_address, local_api_ws_port} = process.env;
  const localUrl = `https://${api_local_ip_address}:${local_api_ws_port}`;
  const liveUrl = `https://ws.${domain_name}`;
  const socketUrl = (IS_OFFLINE) ? localUrl: liveUrl;
  console.log(`https://${event.requestContext.domainName}/${event.requestContext.stage}`)
  // await sendMessageToClient(callbackUrlForAWS, connectionId, event);
  let connectionId = event.requestContext.connectionId;
  console.log(`connectionid is the ${connectionId}`)
  const client = new AWS.ApiGatewayManagementApi({
    apiVersion: '2018-11-29',
    endpoint: socketUrl
  });

  const data = JSON.parse(event.body).data;
  await client
  .postToConnection({
    ConnectionId: event.requestContext.connectionId,
    Data: JSON.stringify(await returnPositionData(data, positions_table_id))
  })
    .promise();

    return {
      statusCode: 200,
    };
  };

  const returnPositionData = async(posData, positions_table_id) => {
      const { type, uid, data} = posData;
    if(data != '') {
      const putParams = {
        Item: {
          type: type,
          uid: uid,
          data: data
        },
        TableName: positions_table_id
      };
      dynamoDb.put(putParams).promise();

      // return nothing and post to dynamo
      await dynamoDb.put(putParams).promise();
    }
    // return all data
    const getParams = {
      TableName: positions_table_id
    };
    const result = await dynamoDb.scan(getParams).promise();
    return result.Items;
}
Retrieving & visualising Websocket data
Now that we’ve understood how to emit user positional data, we can now look at how we render other user positions so you can see them moving in real time!
For this, we need to the RenderAR component and look at how the Avatars component works.
Avatars Component — index.js
This component is responsible for fetching both http and websocket data, then looping through all other users who have an entry saved in DynamoDB and then passing their props into a component called Avatar.
In this section, I’ll talk through both the Front End code and the DynamoDB table that make this work.
This is another big file with lots going on, there are two key areas for you to look at and understand:
- Line 29: where we are passing the last received Websocket data containing all other user positions, the current logged in user and the images of all other logged in users
- Lines 49–56: Where we are rendering out an Avatar component for each user passed into line 29, note that their position / rotation / uid / image are included in the props
import React, { useRef, useState, useEffect, Suspense, lazy } from 'react'
import socketStore from '../../stores/socket';
import Avatar from './Avatar';
import axios from 'axios';
import { httpApiURL } from '../../utils';
import cognitoStore from '../../stores/cognito';

const Avatars = () => {
  const { cognito } = cognitoStore();
  const { lastJsonMessage } = socketStore();
  const [getUserImages, setUserImages] = useState([]);

  useEffect(() => {
    const fetchData = async() => {
      let allData = await getUserData(cognito, 'returnAll');
      let userImages ={};
      for(let x = 0; x<allData.Items.length; x++) {
        userImages[allData.Items[x].username] =allData.Items[x].image
      }
      setUserImages(userImages)
    }
    fetchData();
  }, [cognito])

  return (
    <>
      {
        lastJsonMessage != null &&
        <AvatarList list={lastJsonMessage} cognito={cognito} userImages={getUserImages}/>
      }
    </>
  )
}

const AvatarList = (props) => {
  const { list, cognito, userImages } = props;
  const avatars = [];
  for(let x=0; x<list.length; x++) {
    if(list[x].uid != cognito.username) {
      if(list[x].type == 'users') {
        list[x].image = userImages[list[x].uid];
        avatars.push(list[x]);
      }
    }
  }

  return (
    <>
      {avatars.map(avatar => (
        <Avatar
            position={avatar.data.position}
            rotation={avatar.data.rotation}
            key={avatar.uid}
            image={avatar.image}
        />
      ))}
    </>
  )
};

const getUserData = (cognito, all) => axios({
  method: 'post',
  url: `${httpApiURL}/users/data`,
  data: {
    cognito: all
  },
  headers: {
    'Content-Type': 'application/json',
    'Authorization': `Bearer ${cognito.jwt}`
  }
}).then((res) => {
  const data = JSON.parse(res.data.body);
  return data;
}, (error) => {
  console.log(error);
})


  export default Avatars;
Database for Websocket positional data
I’ve attached below what that Websocket data looks like in DynamoDB.
In that table, you can see that data stored are classified as either objects (e.g 3D models like the dog in the gif at the top of this post) or users.
This post only focuses on how to enable real-time interactions between users, but I’ll likely make another follow up post to explain how a users interactions on other 3D models can be shared in real-time too :D
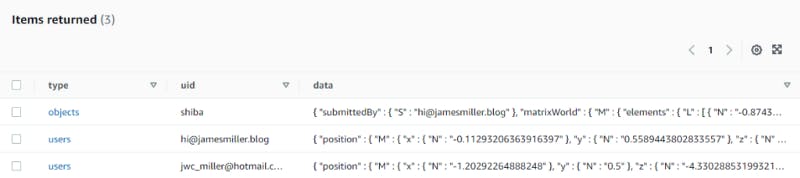
Screenshot of the positional data in the DynamoDB Table
For now, if we look at an example of one of the users in the DynamoDB table, you can see what the positional and rotational data looks like.
It is this data, that is passed through to the Three.JS renderer that updates the Avatar component positions.
{
  "type": {
    "S": "users"
  },
  "uid": {
    "S": "hi@jamesmiller.blog"
  },
  "data": {
    "M": {
      "position": {
        "M": {
          "x": {
            "N": "-0.11293206363916397"
          },
          "y": {
            "N": "0.5589443802833557"
          },
          "z": {
            "N": "-2.7809016704559326"
          }
        }
      },
      "rotation": {
        "M": {
          "x": {
            "N": "0"
          },
          "y": {
            "N": "0.08757950419595575"
          },
          "z": {
            "N": "0"
          }
        }
      }
    }
  }
}
Avatars Component — Avatar.js
Finally, once all the data is passed through to the Avatar component — this is where the magic of visualising the received data happens.
This section of the post will talk through the Front End logic, as well as what the data for the HTTP data looks like.
Key parts of this code to understand are:
- Lines 10–12: The image passed into the component is set as a texture for Three.JS, if one doesn’t exist to loads a backup image
- Lines 16–19: This is where the position and rotation of another logged in user is updated every time the Websocket returns new data
- Lines 24–31: This is where the 3D mesh is rendered as a flat plane with the image loaded as a texture (the one we defined between lines 10–12)
import React, { useRef, useState, useEffect, Suspense, lazy } from 'react'
import { useLoader, useFrame, useThree } from '@react-three/fiber'
import * as THREE from "three";
import userStore from '../../stores/user';

const Avatar = (props) => {
    const { position, rotation, image } = props;
    const avatarMesh = useRef();
    let setImage;
    if(image == undefined) setImage ='photo1.jpg';
    else setImage = image;
    const texture = useLoader(THREE.TextureLoader, `/images/${setImage}`)

    useFrame(() => {
        if(avatarMesh != undefined && rotation != undefined && position!= undefined) {
            avatarMesh.current.rotation.y = -rotation.y;
            avatarMesh.current.position.x = position.x;
            avatarMesh.current.position.y = position.y;
            avatarMesh.current.position.z = position.z;
        }
    });

    return (
        <mesh ref={avatarMesh}>
            <planeBufferGeometry attach="geometry" args={[.5, .5]} />
            <meshBasicMaterial
                attach="material"
                side={THREE.DoubleSide}
                map={texture}
            />
        </mesh>
    )
}
export default Avatar;
Database for HTTP user data
In regards the the ‘non real-time’ data that is rendered on the Front End, this is accessed via the HTTP api and stored in DynamoDB.
Each user is stored as a separate entry in the DynamoDB table and has their role, email address and image saved.

Screenshot of the http user data in the DynamoDB Table
Looking at this data in JSON format, returns this object — this is what is returned to the Front End.
{
  "uid": {
    "S": "hi@jamesmiller.blog"
  },
  "role": {
    "S": "admin"
  },
  "image": {
    "S": "photo1.jpg"
  },
  "username": {
    "S": "hi@jamesmiller.blog"
  }
}
Conclusion
Wow!! If you’ve actually made it here, you’re a champion — congratulations :D
With any luck, you understand the practical sides of how to implement real time user positions within your WebXR application enough to be able to adapt it for your needs.
In my next post I’ll talk about how to implement the results of users interactions with 3D objects with the real-time logic — so that multiple users can interact together with the environment.
Until then, hope you enjoyed this post and have fun :D